Direct Draw Programming

The next thing I started to do is start to experiment with a bit of Direct X coding. I have started with Direct Draw preferring to get an idea of the hard way to do things before starting to use Direct 3D. I have used a set of Data Structures to hold the 3D objects based loosely on the Structures used in the C++ section above. I have modified quite extensively the Direct Draw Example 1 provided with Direct X 6.0. I have also borrowed bits of code from the Flip 2D example also provided with Direct X 6.0. I have already grown to love the Flat memory model. The Flat memory model is a memory model unlike any other C++ model. Instead of having small areas for code, stack and so forth, you can now just do what you like with memory and let Windows 95 sort out the rest.

The top left image shows two triangle that pass through each other with only back face removal. The bottom left image shows the same two triangles but now with a Z-Buffer Implementation. The picture is now a little clearer. The top right image shows the same two triangle displayed with a Z-Buffer with Gouraud shading (Trust me the two triangles should be displayed in shades of red but I have had to modify the palette which Windows doesn't seem to like). The bottom right image shows the same two triangle but now with a Texture map applied to the surface. It is only a very basic texture mapping engine and has a lot of bugs, but it is my first attempt and I do not have any documentation with an understandble description of how texture mapping works.

This time I am afraid that I am not able to put the code up as a page as there are roughly 2000 Lines of code!! But to download the source code click here. To use the source code you will need the Direct X SDK (v6.0). Included are the Visual C++ 5 project files.

To Download the executable click here.

My latest Direct Draw coding has been rewriting various areas of the code used in the previous program. I have now implemented a new Class that contains all the Direct Draw specific code. Instead of forcing myself to use 8-bit colour I set up a system where I use colour masks instead. This means the code now works in 8-bit, 16-bit, 24-bit or 32-bit colour. There is a loss of detail in certain modes, especially 8-bit, but the code is now totally system independent ... I hope ( It works on an AMD K6-2 300 with an S3 Savage 3D or an ATI Rage Pro AGP as well as a Pentium 200 running an ATI Rage PCI).

On the left is the 8-bit version (which has an incorrect palette due to my palette redefinition) and on the right is the 32-bit version (Trust me they are the same colour schemes!). The major upgrades to the system are Fogging, which is performed while the image is gouraud haded and a World coordinate system. A Camera is also defined in the world so that it is possible to fly around. Movement is handled using Direct Input. The Gouraud shading system was significantly upgraded so that now it interpolates the red the green and the blue channels individually to allow a much nicer effect (except in 8-bit mode). The loss of detail in 8-bit is due to the fact that to squeeze the 16.7 million colour possibilities in I was forced to use 3-bits for red, 2-bits for green and 3-bits for blue. This time the actual code is not quite as user redefinable as before and to change to Flat shading, Fogging or texture mapping you need to make a slight code modification.

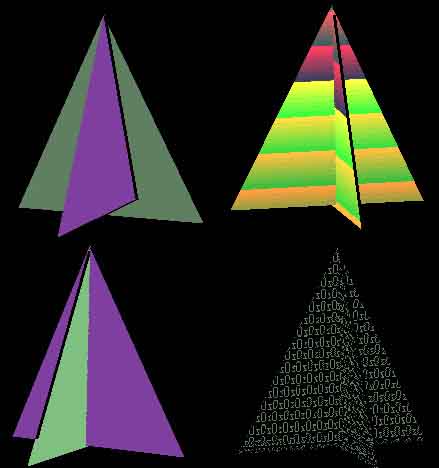
td->SetRenderType(DDZBuffer + DDGouraud);

The above is the current definition but for flat shading you need only change it to -

td->SetRenderType(DDZBuffer);

for fogging to -

td->SetRenderType(DDZBuffer + DDFog);

and for texture mapping to -

td->SetRenderType(DDZBuffer + DDTexture);

The keys are as follow -

A - Forward, Z - Back, Left Shift - Move Left, Right Shift - Move Right, S - Move Up, C - Move Down

Use the mouse to look a round.

Again it is a Visual C++ 5.0 workspace so to download the workspace click here.

To download the executable click here.